
Creating an erupting volcano for a school project is a fun and educational activity that can spark curiosity about geology and science.
To make an erupting volcano, all you need are some simple household items like baking soda, vinegar, and a container to form your volcano shape. This project not only demonstrates how volcanoes work but also allows students to witness a chemical reaction that mimics a volcanic eruption.
The process of building a volcano can be just as exciting as the eruption itself.
Students can mold the volcano shape from materials like clay or papier mache, making it visually appealing. As they prepare for the eruption, they engage with science in a hands-on way, solidifying their understanding of how eruptions occur in nature.
Whether it’s for a school assignment or just a fun experiment at home, making an erupting volcano captivates the imagination and encourages exploration of Earth science. The satisfaction of watching the “lava” flow and bubble will undoubtedly make this project a highlight in any student’s academic journey.
Materials and Preparation
To create an erupting volcano model, specific materials are required for both the construction and the eruption process.
Proper preparation is essential to ensure that the project is successful and engaging.
Gathering Materials
The first step is to collect all necessary materials. For the volcano model, one can use:
- Cardboard for the base
- Newspaper for creating the structure
- Flour and water for a simple papier-mâché mix
- A plastic bottle or water bottle as the volcano’s core
- Vinegar and baking soda for the eruption
- Food coloring to enhance the lava effect
- Paint to decorate the volcano
These items are mostly household items. Students can find them easily at home or at local stores. This makes the project both fun and budget-friendly.
Building the Volcano Structure
Once the materials are gathered, the next step is to build the volcano.
Start by cutting the cardboard into a square or circle to serve as the base.
Then, place the plastic bottle or water bottle in the center of the base. This will act as the crater for the eruption.
Next, use the newspaper dipped in the papier-mâché mixture (made with flour and water) to create a cone shape around the bottle. Building this sturdy structure allows for a more stable eruption.
Finally, let the structure dry completely before painting it with a realistic color scheme. Adding decorative elements will make the volcano more visually appealing.
Simulating the Eruption

Creating a realistic eruption involves mixing certain materials to mimic how real volcanoes work. The key components are common household items that create a fun and surprising reaction, making the project engaging and educational.
Creating the Chemical Reaction
To simulate a volcanic eruption, start by preparing the eruption ingredients.
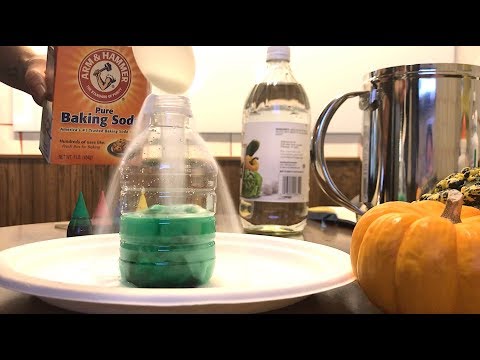
The main ingredients needed are baking soda and vinegar.
- Prepare the volcano model: Ensure the volcano model is ready, and its crater is accessible.
- Add baking soda: Place about one tablespoon of baking soda into the crater. This creates the base for the eruption.
- Add dish soap: Mix in a few drops of dish soap. This helps to create more foamy “lava,” which looks like a real eruption.
- Pour vinegar: At the moment of the eruption, pour vinegar slowly into the crater. The chemical reaction with baking soda will create carbon dioxide gas, resulting in bubbling and foaming that simulate lava flowing out of the volcano.
This simple chemical reaction accurately represents how magma rises and erupts from real volcanoes, turning into lava as it flows.
Decorating the Volcano
Before making the eruption happen, decorating the volcano adds to its visual appeal. A creative appearance can enhance the project’s impact.
Here’s how to decorate:
- Use paint: Apply brown, red, or black paint to make the volcano look realistic. The colors represent the exterior of many real volcanoes.
- Add texture: Use crumpled paper or clay to create a rough surface, mimicking how volcanic rock appears.
- Incorporate food coloring: A few drops of red or orange food coloring in the vinegar make the “lava” appear more vibrant and lifelike during the eruption.
These decorations not only make the model more eye-catching but also deepen understanding of volcanoes and their natural beauty.